개요
GitOps 인 ArgoCD가 바라보는 Git Repository 에 비밀번호등 보안이 필요한 데이터를 보호하고 노출하지 않게하기 위해 비밀키 저장소인 Vault 를 설치하고 argocd-vault-plugin 으로 연결해보겠습니다.
Install
Vault 설치
Vault-Guides git clone (Helm Values)
1
2
| git clone https://github.com/hashicorp/vault-guides.git
cd vault-guides/operations/provision-vault/kubernetes/minikube/getting-started
|
Namespace 생성
1
| kubectl create ns vault
|
Consul 설치 (Helm)
1
2
3
| helm repo add hashicorp https://helm.releases.hashicorp.com
helm repo update
helm install consul hashicorp/consul --values helm-consul-values.yml -n vault
|
PVC 수정 (StroageClass)
Rook Ceph 설치 문서 참조
1
| kubectl get pvc -n vault -o yaml data-vault-consul-consul-server-0 > pvc.yaml
|
pvc.yaml
1
2
3
4
5
6
7
8
9
10
11
12
13
14
15
16
17
18
19
20
21
22
23
24
25
26
27
28
29
30
31
32
33
34
35
36
| apiVersion: v1
kind: PersistentVolumeClaim
metadata:
annotations:
pv.kubernetes.io/bind-completed: "yes"
pv.kubernetes.io/bound-by-controller: "yes"
volume.beta.kubernetes.io/storage-provisioner: rook-ceph.rbd.csi.ceph.com
volume.kubernetes.io/storage-provisioner: rook-ceph.rbd.csi.ceph.com
creationTimestamp: "2022-04-19T05:27:57Z"
finalizers:
- kubernetes.io/pvc-protection
labels:
app: consul
chart: consul-helm
component: server
hasDNS: "true"
release: consul
name: data-vault-consul-consul-server-0
namespace: vault
resourceVersion: "338546"
uid: 6e801504-3d4f-435e-9e5f-38b39240abc9
spec:
accessModes:
- ReadWriteOnce
resources:
requests:
storage: 10Gi
**storageClassName: rook-ceph-block**
volumeMode: Filesystem
volumeName: pvc-6e801504-3d4f-435e-9e5f-38b39240abc9
status:
accessModes:
- ReadWriteOnce
capacity:
storage: 10Gi
phase: Bound
|
1
2
| kubectl delete -f pvc.yaml
kubectl create -f pvc.yaml
|
Vault 설치
1
| helm install vault hashicorp/vault --values helm-vault-values.yml -n vault
|
** Pod Running 0/1 정상 (Vault Initialize 및 Unseal을 해야 1/1로 올라옴) **
Vault Initialize 및 Unseal
1
2
3
4
| apt update && apt install -y jq
kubectl exec -n vault vault-0 -- vault operator init -key-shares=1 -key-threshold=1 -format=json > keys.json
VAULT_UNSEAL_KEY=$(cat keys.json | jq -r ".unseal_keys_b64[]")
|
vault-0, vault-1, vault-2 Pod에서 Unseal 합니다.
1
2
3
| kubectl exec -n vault vault-0 -- vault operator unseal $VAULT_UNSEAL_KEY
kubectl exec -n vault vault-1 -- vault operator unseal $VAULT_UNSEAL_KEY
kubectl exec -n vault vault-2 -- vault operator unseal $VAULT_UNSEAL_KEY
|
Vault Secret 생성 및 Kubernetes 인증 구성
Vault Secret 설정
root token을 확인합니다.
1
| cat keys.json | jq -r ".root_token"
|
vault-0 에 접속 후 Login을 합니다.
1
| kubectl exec --stdin=true --tty=true -n vault vault-0 -- /bin/sh
|
1
2
| vault login
Token (will be hidden): 토큰 값
|
kv-v2 secret을 secret 경로에 활성화합니다.
1
| vault secrets enable -path=secret kv-v2
|
secret에 secret data을 생성합니다.
1
2
3
4
| vault kv put secret/example-app/secret \
db-user="example-app" \
db-password="password" \
db-root-password="root-password"
|
Vault Kubernetes 인증 구성
kubernetes의 서비스 계정 토큰으로 vault secret에 접근하기 위해서 kubernetes 인증을 활성화 합니다.
1
2
3
4
5
6
| vault auth enable kubernetes
vault write auth/kubernetes/config \
token_reviewer_jwt="$(cat /var/run/secrets/kubernetes.io/serviceaccount/token)" \
kubernetes_host="https://$KUBERNETES_PORT_443_TCP_ADDR:443" \
kubernetes_ca_cert=@/var/run/secrets/kubernetes.io/serviceaccount/ca.crt
|
example-app secret에 대한 read 권한을 생성합니다.
1
2
3
4
5
| vault policy write example-app - <<EOF
path "secret/data/example-app/*" {
capabilities = ["read"]
}
EOF
|
ArgoCD의 default 서비스 계정과 vault의 example-app 정책을 연결하는 역할을 만듭니다. ArgoCD의 서비스 계정은 kubectl get sa -n argocd 명령으로 확인할 수 있습니다.
1
2
3
4
5
| vault write auth/kubernetes/role/argocd \
bound_service_account_names=default \
bound_service_account_namespaces=argocd \
policies=example-app \
ttl=24h
|
policies는 위에서 생성한 example-app policy를 추가합니다.
argocd-vault-plugin
argocd-vault-plugin는 kubernetes YAML 파일 안에 <secret-key | base64encode> 형식을 vault 값으로 변환해줍니다. argocd-repo-server에 argocd-vault-plugin을 설치하고 vault 인증정보를 설정하면 ArgoCD에서 배포 시점에 vault 값을 kubernetes YAML 파일에 적용시킵니다.
Vault Service 주소 확인
1
2
3
| kubectl get svc -n vault vault
NAME TYPE CLUSTER-IP EXTERNAL-IP PORT(S) AGE
vault ClusterIP **10.233.38.48** <none> **8200/TCP**,8201/TCP 18h
|
vault 주소는 http://CLUSTER-IP:8200 입니다.
ArgoCD Vault Secret
argocd-repo-server에서 vault에 접근하기 위한 인증정보를 생성합니다. VAULT_ADDR는 위에서 확인한 vault 주소이며, AVP_K8S_ROLE는 Vault Kubernetes 인증 구성에서 만든 role 이름(argocd) 입니다. argocd-vault-plugin-keyring.yaml
1
2
3
4
5
6
7
8
9
10
11
| kind: Secret
apiVersion: v1
metadata:
name: argocd-vault-plugin-keyring
namespace: argocd
type: Opaque
stringData:
VAULT_ADDR: http://10.233.38.48:8200
AVP_TYPE: vault
AVP_AUTH_TYPE: k8s
AVP_K8S_ROLE: argocd
|
1
| kubectl create -f argocd-vault-plugin-keyring.yaml
|
argocd-repo-server 설정 편집
1
| kubectl edit deployment argocd-repo-server -n argocd -o yaml
|
automountServiceAccountToken: false → true
1
| automountServiceAccountToken: true
|
container argocd-repo-server 에 volumemounts, envFrom 추가
1
2
3
4
5
6
7
8
9
| containers:
- name: argocd-repo-server
volumeMounts:
**- mountPath: /usr/local/bin/argocd-vault-plugin
name: custom-tools
subPath: argocd-vault-plugin**
**envFrom:
- secretRef:
name: argocd-vault-plugin-keyring**
|
volumes 에 custom-tools 추가
1
2
3
| volumes:
- emptyDir: {}
name: custom-tools
|
initContainers 에 download-tools 추가 AVP_VERSION 은 github release 참고 (링크)
1
2
3
4
5
6
7
8
9
10
11
12
13
14
15
16
| initContainers:
- name: download-tools
image: alpine:3.8
command: [sh, -c]
env:
- name: AVP_VERSION
value: "1.17.0"
args:
- >-
wget -O argocd-vault-plugin
https://github.com/argoproj-labs/argocd-vault-plugin/releases/download/v${AVP_VERSION}/argocd-vault-plugin_${AVP_VERSION}_linux_amd64 &&
chmod +x argocd-vault-plugin &&
mv argocd-vault-plugin /custom-tools/
volumeMounts:
- mountPath: /custom-tools
name: custom-tools
|
argocd-cm data 추가
1
| kubectl edit cm -n argocd argocd-cm -o yaml
|
아래 내용 추가
1
2
3
4
5
6
7
8
9
10
11
12
13
14
| data:
configManagementPlugins: |
- name: argocd-vault-plugin
generate:
command: ["argocd-vault-plugin"]
args: ["generate", "./"]
- name: argocd-vault-plugin-helm
generate:
command: ["sh", "-c"]
args: ["helm template . > all.yaml && argocd-vault-plugin generate all.yaml"]
- name: argocd-vault-plugin-kustomize
generate:
command: ["sh", "-c"]
args: ["kustomize build . > all.yaml && argocd-vault-plugin generate all.yaml"]
|
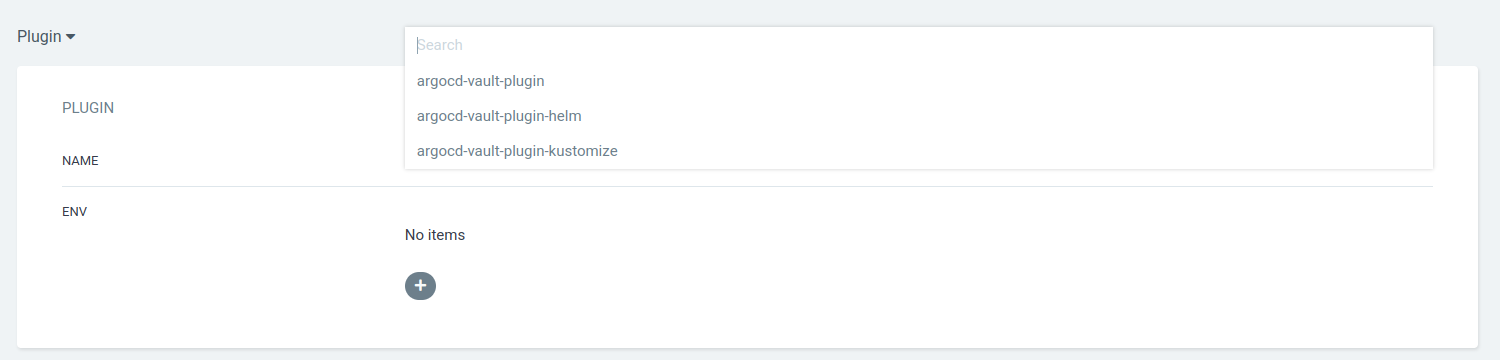
ArgoCD plugin 연결
ArgoCD에서 앱 등록화면에서 Directory 를 클릭해서 Plugin 으로 변경합니다. 플러그인 종류는 현재 kustomize를 사용하고 있기 때문에 argocd-vault-plugin-kustomize 를 선택합니다.
Test
secret 수정
dev/db/secret.yaml
1
2
3
4
5
6
7
8
9
10
11
12
| apiVersion: v1
kind: Secret
metadata:
name: example-app-secret
labels:
app: example-app
annotations:
avp.kubernetes.io/path: "secret/data/example-app/secret"
type: Opaque
data:
DB_USERNAME: <db-user | base64encode>
DB_PASSWORD: <db-password | base64encode>
|
avp.kubernetes.io/path는 vault secret이 저장된 path를 입력 합니다.
deployment 수정
1
2
3
4
5
6
7
8
9
10
11
12
13
14
15
16
17
18
19
20
21
22
23
24
25
26
27
28
29
30
31
32
33
34
35
36
37
38
39
| apiVersion: apps/v1
kind: Deployment
metadata:
name: postgres
spec:
selector:
matchLabels:
app: example-app
template:
metadata:
labels:
app: example-app
spec:
containers:
- name: postgres
image: postgres:latest
env:
- name: POSTGRES_USER
valueFrom:
**secretKeyRef:
name: example-app-secret
key: DB_USERNAME**
- name: POSTGRES_PASSWORD
valueFrom:
**secretKeyRef:
name: example-app-secret
key: DB_PASSWORD**
- name: PGDATA
value: "/var/lib/postgresql/data/k8s"
ports:
- containerPort: 5432
protocol: TCP
volumeMounts:
- name: example-app-volume
mountPath: /var/lib/postgresql/data
volumes:
- name: example-app-volume
persistentVolumeClaim:
claimName: example-app-pvc
|
kustomization.yaml에 secret 추가
dev/db/kustomization.yaml
1
2
3
4
5
6
7
| apiVersion: kustomize.config.k8s.io/v1beta1
kind: Kustomization
resources:
- pvc.yaml
- service.yaml
- deployment.yaml
- secret.yaml
|
이제 수정한 파일을 git에 push하고 ArgoCD에서 동기화가 잘되는지 확인하면 됩니다.
마치며
consul install 에서 pvc에 대한 설명이 없어서 삽질을 했는데, 미리 만들어둔 StorageClass 를 등록해주면서 쉽게 해결했습니다. (Rook Ceph 문서 참조) secret 에 대한 중요한 데이터를 private git server에 올리면 상관 없겠지만, github 등 public한 repository에 올릴때는 유용하게 사용할 수 있을 것 같습니다.
Reference
 플러그인 종류는 현재 kustomize를 사용하고 있기 때문에